
WooCommerce Crypto Payment Plugin for WordPress
This is a ready-to-use plugin for integrating with your website on Woocommerce WordPress CMS and accepting cryptocurrency payments.
Millions of website owners prefer this platform.
When we talk about a CMS-based website, the first thing that comes to mind is Woocommerce WordPress (WP).
With WP, you can create both a simple single-page website and a large project with a complex structure and extensive volumes of information, such as an online store.
How does it work?

Create a business account in PassimPay

Add your project to your account

Download the Woocommerce WordPress payment plugin

Integrate it using the instructions

Receive payments in cryptocurrency
When you set up the plugin, payments route through PassimPay, with funds instantly appearing in your account. Users select items, pay via a checkout page, and confirm the payment.
Detailed statistics, charts, and filters help track payments by project, date, and currency, accessible in your account for easy withdrawal.
Information about the Woocommerce WordPress payment module
The functions and various plugins of the service allow for making a WP site convenient for users. With Woocommerce WordPress, you can connect ready-made software solutions for receiving and sending cryptocurrencies.
The PassimPay payment module for Woocommerce WordPress is easy to integrate and allows you to receive payments for your goods/services in cryptocurrency in just a few clicks
How to integrate the Passimpay plugin for WooCommerce (WordPress)
01 Passimpay project settings
When creating or editing your project in the Passimpay dashboard, set Successful URL and Fail URL to valid pages on your store (for example, the order thank-you page or any working URLs you use for return flows).
Successful URL: https://shop.com/checkout/order-received/ (example; can be any working link)
Fail URL: https://shop.com/cart/ (example; can be any working link)
Notification URL: after you install and open the plugin settings (step 03–04), copy the exact Notification URL shown there and paste it into your Passimpay project. It normally looks like:
https://your-shop.com/?wc-api=passimpay
Do not use legacy paths such as /payment/notification unless your Passimpay project explicitly requires them — the WooCommerce plugin listens on the wc-api=passimpay endpoint.
02 Install and activate
Upload and install the plugin archive (e.g. passimpay.io.zip), or upload the plugin folder so that the main file passimpay.io.php is inside wp-content/plugins/. Activate the plugin in Plugins.
03 Configure WooCommerce
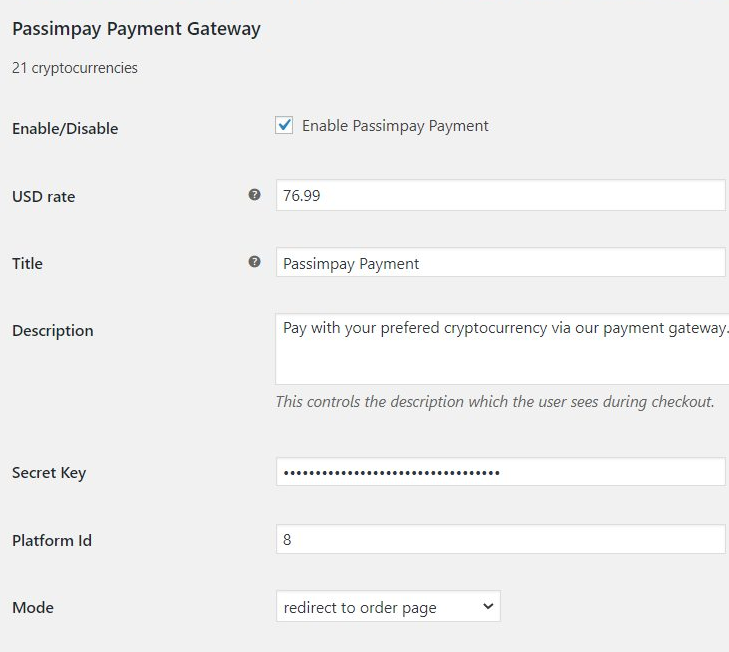
Go to WooCommerce → Settings → Payments and open Passimpay Payment Gateway.
- Enable the gateway.
- Copy the Notification URL from this screen into your Passimpay project (see step 01).
- Enter Platform Id and Secret Key from your Passimpay account.
- Under Payment options, choose what appears on the Passimpay payment page: card and cryptocurrency, cryptocurrency only, or bank card only. This must match your Passimpay platform settings. If you use cards, enable Cards/Bank transfer in Passimpay.
Save changes.
The plugin is ready to use. Before going live, run a test payment in each mode you plan to use.