
Crypto Payment Plugin for Tilda
Tilda is a versatile website builder that empowers users to create beautiful, responsive websites without any coding knowledge.
With its intuitive interface and a wide range of customizable templates and blocks, Tilda offers a seamless web design experience for individuals and businesses alike.
How does it work?

Create a business account in PassimPay

Add your project to your account

Download the Tilda payment plugin

Integrate it using the instructions

Receive payments in cryptocurrency
When you set up the plugin, payments route through PassimPay, with funds instantly appearing in your account. Users select items, pay via a checkout page, and confirm the payment.
Detailed statistics, charts, and filters help track payments by project, date, and currency, accessible in your account for easy withdrawal.
Information about the payment module for Tilda
Tilda offers a range of functions for building websites, including a user-friendly interface, customizable templates, and blocks for easy design.
Additionally, we provide a payment plugin that enables your Tilda-based websites to accept cryptopayments, enhancing the versatility and convenience of online transactions.
How to integrate the plugin for Tilda
01 On the page https://passimpay.io/account/platform/module, add a new project and save the API KEY and Platform ID.
02 Go to the project dashboard in Tilda. Go to settings — "Payment Systems" and select "Universal Payment System" (Custom payment gateway). Enter the Platform ID in the "Login" field and enter the API KEY in the "Secret for order sign" field.
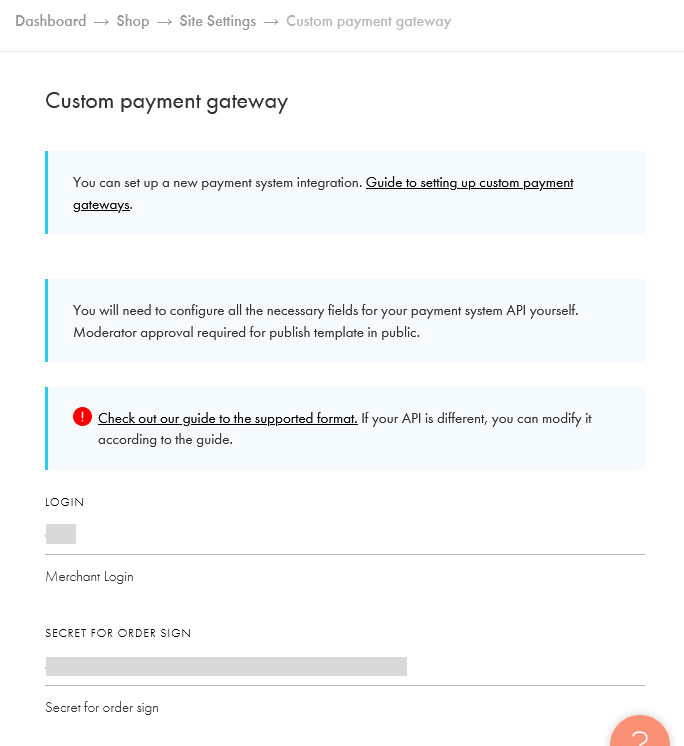
03 Specify USD in the "CURRENCY" field.
04 Go to ADVANCED SETTINGS.
05 Specify the "API URL" in the field. https://api.passimpay.io/createorder.
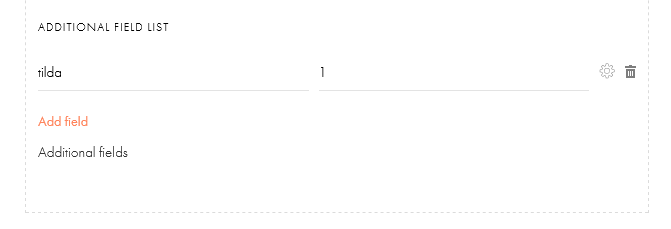
06 Fill in the remaining fields as shown in the example below.

07 Create an additional field. To do this, click "Add field" and specify the field name — tilda, field value — 1.
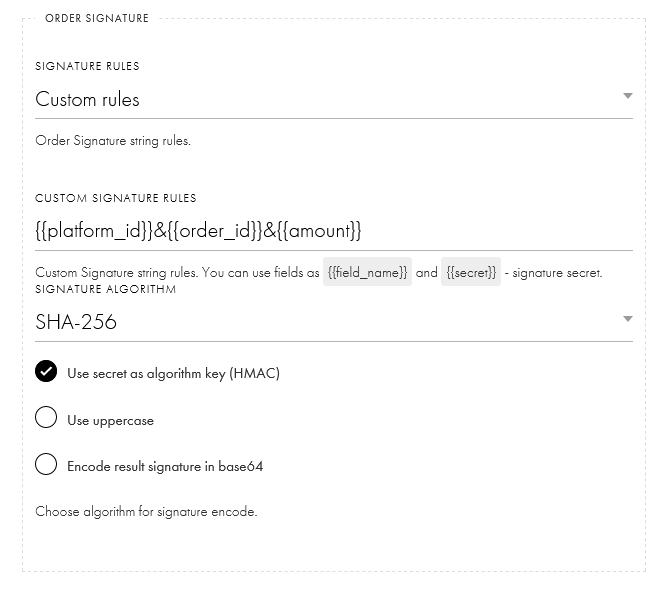
08 ORDER SIGNATURE, select "Custom rules" for the SIGNATURE RULES field.
09 Specify in the "CUSTOM SIGNATURE RULES" field. {{platform_id}}&{{order_id}}&{{amount}}
10 Specify in the "SIGNATURE ENCRYPTION ALGORITHM" field. SHA-256
11 Tick "Use secret as the algorithm key (HMAC)".
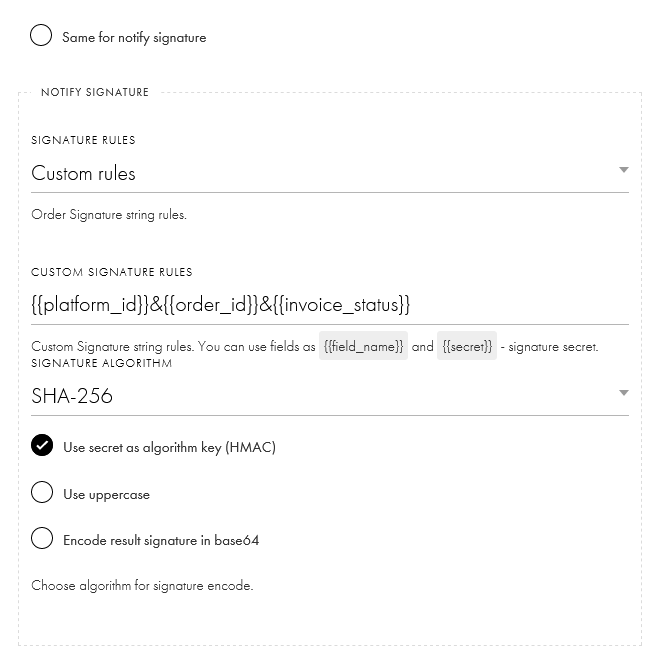
12 Untick "Use the same rules for notification signature".
13 NOTIFICATION SIGNATURE, select "Custom rules" for the SIGNATURE RULES field.
14 Specify in the "CUSTOM SIGNATURE RULES" field. {{platform_id}}&{{order_id}}&{{invoice_status}}
15 Specify in the "SIGNATURE ENCRYPTION ALGORITHM" field. SHA-256
16 Tick "Use secret as the algorithm key (HMAC)".
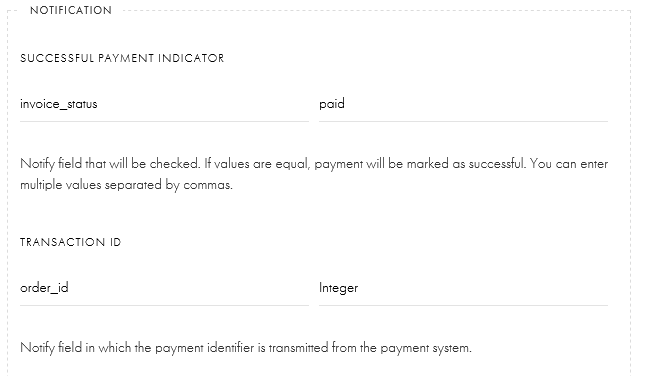
17 NOTIFICATION, specify invoice_status in the SUCCESSFUL PAYMENT INDICATOR field, value — paid.
18 Specify order_id in the TRANSACTION IDENTIFIER field, select — Integer.
19 To let customers see the payment method name, name it as “Pay with cryptocurrency via Passimpay”.
20 After saving, a link will appear in the "NOTIFICATION URL" field, and save it.
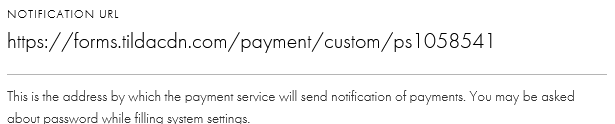
21 On the page https://account.passimpay.io/platform/module, go to the settings of the created module and paste the copied link from the store settings (item 20) into the "Notification URL" field.
22 Enable "My project on CMS" in the CMS settings, select Tilda from the list, and click "Save".

The plugin is ready to use! Before launching the plugin, we recommend conducting a test payment.